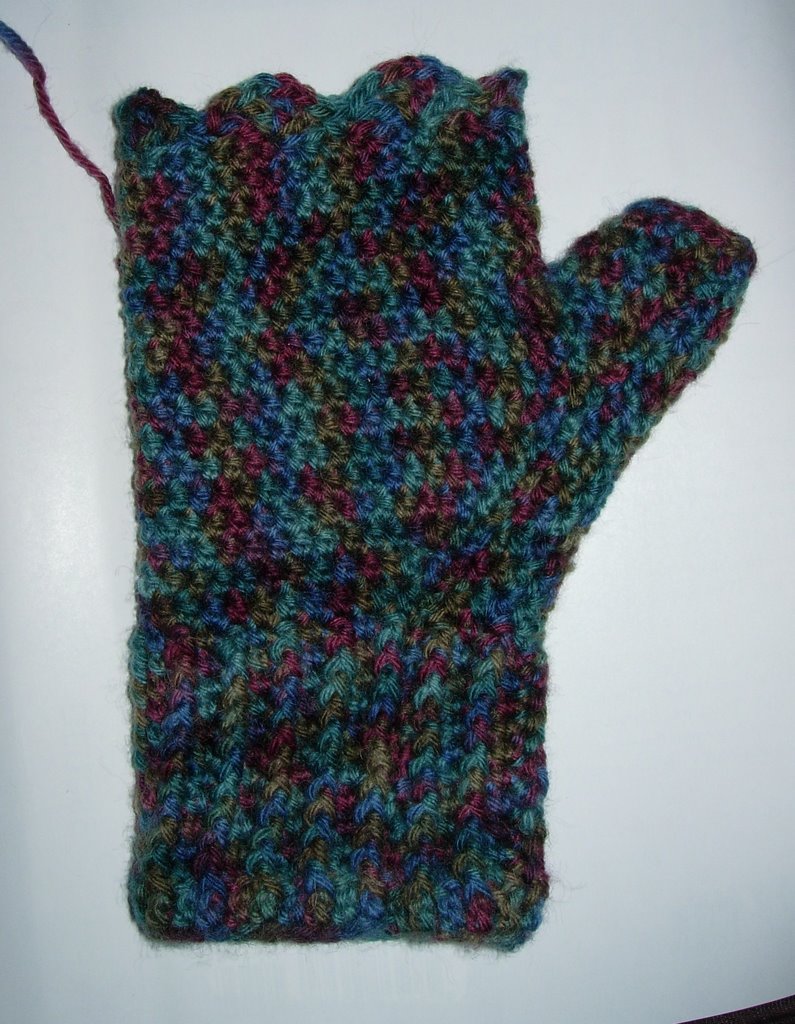
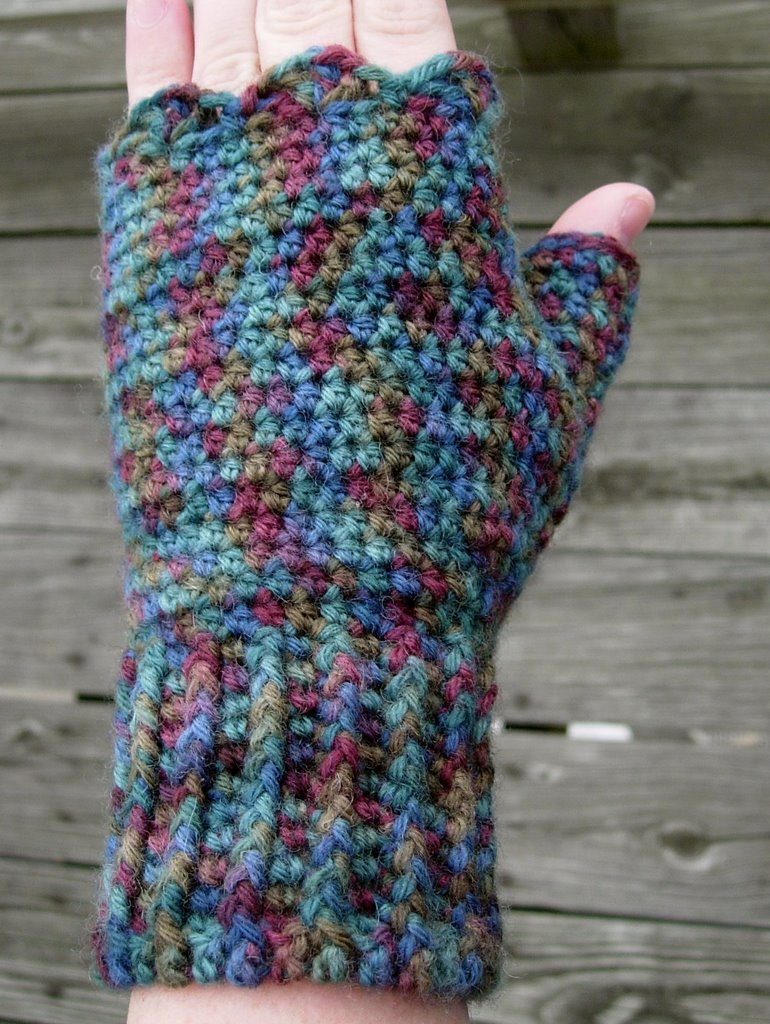
FINGERLESS MITTS
Hook: Size G
Yarn: DK Weight
Stitches:
ch = chain
sl st = slip stitch
sc = single crochet
hdc = half double crochet
fpdc = front post double crochet
shell = sk 2, [*dc, ch1* three times, dc] all in next stitch, sk 2, sc in next stitch
Double foundation chain = Ch 2, sc in second chain from hook. Insert hook under the left hand thread of the sc just made and complete next sc. Continue in this manner until chain is desired length.
Tips:
- Adjust base chain length as needed in multiples of two (i.e. Even # of stitches)
- Try mitt on after completing the first few rows of ribbing to make sure it will slide on easily.
Ribbed Cuff
ROW 1: Double Foundation Chain 30 stitches, join into a ring being careful not to twist, ch3 DO NOT TURN
ROW 2: Work dc into the bottom loops of each stitch around, join with a sl st into first dc (30 dc)
ROW 3: Ch 1, turn so right side is facing you. *Sc into join, fpdc around next st* repeat around then join with a sl st into first sc. DO NOT TURN
ROW 4: Ch 1, *Sc into join, fpdc around fpdc of previous row* repeat around then join with a sl st into first sc. DO NOT TURN
ROW 5 - 12 Repeat row 4 (cuff can be made shorter or longer as desired by subtracting or adding rows of ribbing)
Begin Lower Body:
ROW 1: Ch 2, hdc in join, 2hdc in next stitch (this will be in the "valley" of a rib), hdc in each stitch around to last two, 2hdc in next to last stitch, hdc in last stitch. Join with a sl st to first hdc. DO NOT TURN
ROW 2: Ch 2, hdc in join, 2hdc in next stitch, hdc in each stitch around to last two, 2hdc in next to last stitch, hdc in last stitch. Join with a sl st to first hdc. DO NOT TURN
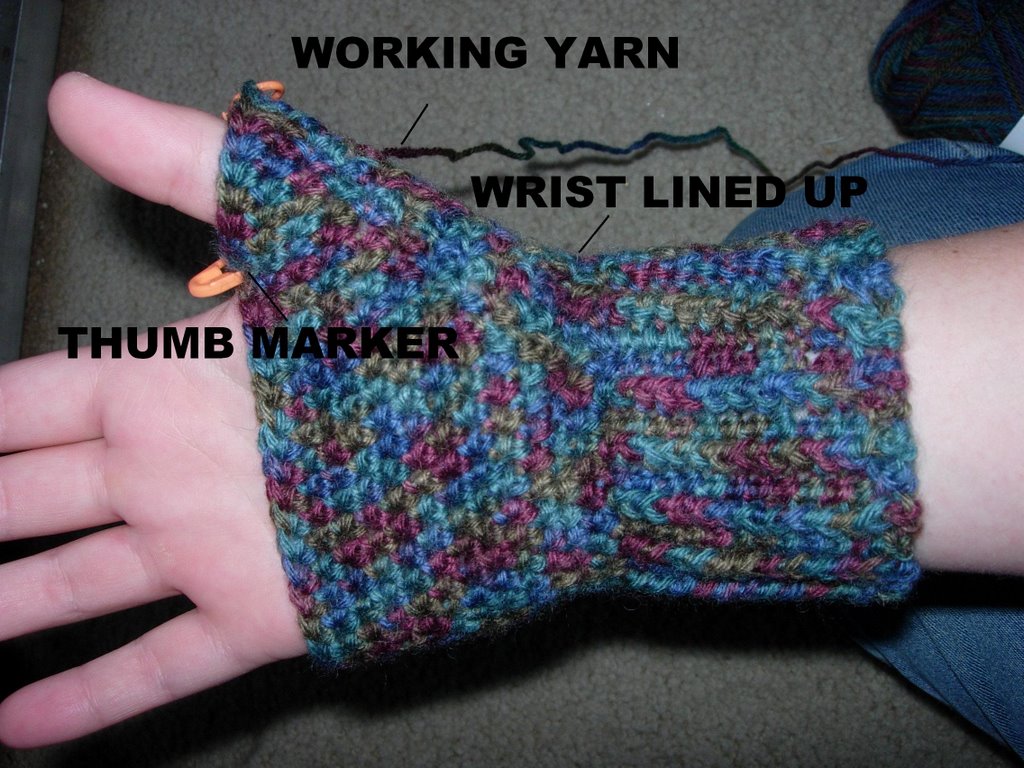
Repeat row 2 until body is long enough when tried on for the fabric to meet when gently pinched together at the base of the thumb where it meets the rest of the hand. For my hands this was 11 or 12 rows.
Insert a stitch marker in this location through both layers to determine a comfortable location for joining the thumb.
(click picture for larger image)
Thumb
ROW 1: Ch 2, hdc in each stitch around to where you placed the stitch marker, hdc through both layers then continue around. Join with sl st to first hdc. DO NOT TURN
ROW 2: Ch 2, hdc to within two stitches of the where the hdc was worked through both layers, hdc 2tog, hdc in next stitch, hdc 2 tog, hdc in each stitch around to beginning. Join with a sl st into the first hdc.
ROW 3: Ch 2, hdc in each stitch around, join to first hdc.
Repeat row three until thumb is desired length.
FINISH - work a loose slip stitch into each stitch around. Join and end off. Weave in end.
Upper Body
ROW 1: Join yarn with a sl st at the base of the thumb. Sl st through both layers for the next two stitches. Ch 2, work hdc in each stitch around. Join with sl st to first hdc. DO NOT TURN
ROW 2: ch 2, work hdc in each stitch around, join with a sl st to first hdc. DO NOT TURN
Repeat row 2 until within a row of the desired length. Count stitches. Adjust by increasing or decreasing to yield a multiple of five stitches.
Edging
Ch 1, sc in join, shell around, join with sl st to first sc and fasten off.

27 comments:
Those mitts came out so gorgeous! Great job on the pattern.
Great Mitts!!! Hope more people post when they make them, I'd love to see!!
Beautiful mitts! They make me want to do some crochet!!
They are so nice! I just sent my Mom a link to your pattern in hopes she might make me some (I don't crochet)... lol!
Terrific pattern-thanks for sharing!
going to give these a whirl! love the pattern!
Just made these for getting through a cool fall in Madrid. They're lovely! I put some pix up on my blog:
vonCookie's CraftyBits. Thanks for the pattern!
Found them from Ravelry! Nice work, good to see something with an actual thumb in it, not just a hole for it to go through.
Thanks so much for this pattern. I'm trying to learn to crochet and after the mandatory washcloth was looking for something besides a scarf or afghan to crochet. If I can follow this pattern anyone can. I'm finished with the first and working my way up the ribbing in the second. I kind of wish I made the ribbing a bit tighter as the whole thing is a bit big but that is my error or rather lack of experience. I'm wearing the first completed mitt as I crochet the second as it's December and I'm in Colorado and it is a mite cold in our house. These are great to wear as you do handwork - warm hands and free fingers
Thanks, Im gonna do these in Pink Camo :)
I am confused. . . first where it says work DC in the bottom loops. . . what does that mean? Secondly. . . "sc to join, fpdc around next stitch" .. . . . does that mean. . . sc, fpdc, sc, fpdc, sc fpdc. . . etc??
Thank you for this cute pattern! I found that in the row Carmela Marshalek is referencing, the cuff gets way too big if you add a sc between each fpdc. I've been doing fpdc only around the next stitch (omitting the sc) and it's made for a tighter cuff. I also reducecd the overall initial stitch count, from 30 to 26. Thinking this one will be a bit more snug, which I was trying for.
I don't understand where it says work DC in the bottom loops
What is considered the bottom loop?
I am a pretty experienced crocheter but had a difficult time with this pattern. Close up photos the steps mentioned in previous posts would be helpful. They are very lovely and I would like to make them.
Thanks for the free share, Very kind of you. I hope to make myself you may hear from me if I run into trouble. But looks like a simple pattern, when you say DC in the bottom loops are you meaning BACK loop? Thanks again.
Why are you not answering people??? What the heck is the bottom loop?????????.??
Hi Mmadeline. Just downloaded this pattern and noticed your question. If you go onto YouTube and look for "Double foundation chain in crotchet" it shows you step by step but also shows you where the bottom loop is. Hope this helps.
I really would like to make these gloves. Does anyone know how much yarn I will need? Thanks.
I went and got one skein of light worsted,I made them smaller than this pattern. I had enough yarn left over to make an ear warmer and a headband.
Gee, thanks so very much!!!!
I made these (with a little modification) for my son's significant other for Christmas, along with a matching scarf and a pony tail hat, and she loved them!!
I made these. Took two hours if googling what was meant by working in the bottom loops on the ribbed cuff. Also the ribbed cuff isn't a true rib stitching. Maybe a second pair would work up easier now.
Yes beautiful pattern but unclear. Row 2: should be 30 DC, are you counting the chain 3 as a double crochet? Are you calling the bottom loop the front loop? Please respond because I am trying to make now.
Did anyone find out what the bottom loop is. The YouTube video doesn't show what it is. How do you join
If I understand correctly, and from the picture. The dc in bottom loop, creates a rolled edge for a nice entry to mitt. I am using it that way, as it works nicely. The next row is a bit harder to see where to put the sts in, but can be figured out. On the questions about if it is sc and fpdc alternating. I am interpreting it that way, when the fpdc is made it drops the stitch down to almost same height as a sc across top of row, so it works out. But it will create a ribbed look which is popular for wrists of various projects. I hope that helps. It works for me, anyway. Might be alternatives though.
Post a Comment